Here are the packs I made 2 years ago (oh how time flew so fast?) - sandwich and snack packs.
I used cotton as the outside fabric and ripstop nylon for lining. It has no other fasteners, just french seams and flap over - So simple yet effective.
I just throw them in the dishwasher when it needs a wash, inside out.
I will do a tutorial on this when I get a chance, so bear with me or send me many comments to make me feel guilty and do it asap! :D
Cheers till later.
Feb 28, 2012
Feb 7, 2012
Dec 12, 2011
Tutorial - Xmas 'Paper' Chain
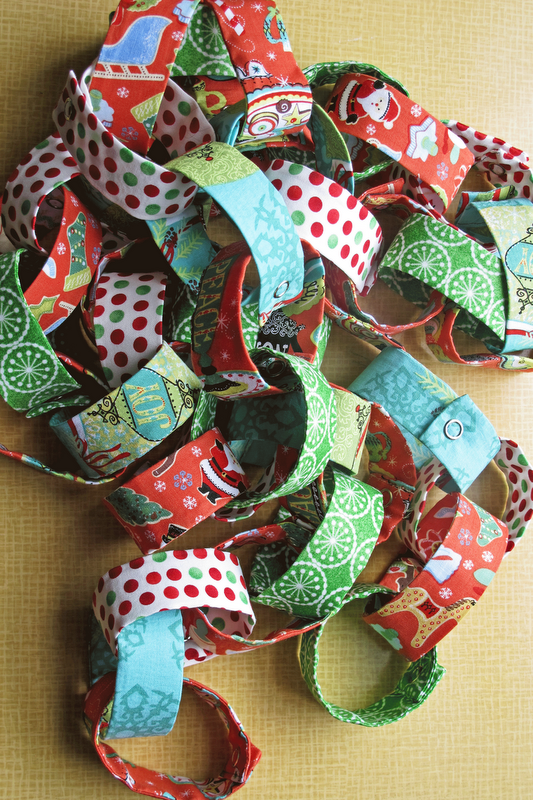
Xmas Fabric 'paper' chain
I got the idea from filminthefridge.com, however I made some modifications. So thought I'd create a tutorial on making this and using the snap-fasteners as it took me a bit to work out how it really works and I cannot find one online!
So to have a chain of 70, you would need:
Cut all 5 fat quarter fabric so they're 21" x 19" or 54cm x 48cm.
Then fold it into half at the widest side.
Here, you'll be cutting strips of 3" x 19" - 7.5cm x 48cm (the widest side being folded in half - hope this make sense?). You should have 7 strips then.
Now, open the strips and cut in middle, thus you'll have 14 strips of 3" x 9&1/2" - 7.5cm x 24cm per fat quarter.
Interface - As there are many types of interfacing, I decided on thin type of interfacing as I wanted it to be more paper-like, rather than 'puffy' fabric. So I used non woven iron-on interface, the one I found was labelled as 100cm white non-woven iron-on interfacing fabric which was priced at about AU$2.50 per metre. Here I've tried to take a photo to show how you'd know if it is iron-on interfacing fabric, but didn't really succeed. On one side you'll see tiny shiny dots, while the other side doesn't have that - that means the shiny dotted side is the one you'd want to iron onto the fabric as they're glue.
Anyway, if you've cut the 100cm wide interfacing fabric at 8&1/2" - 21.5cm twice, you'll then need to cut both wide strips into 1" - 2.5cm strips. Thus you should have 80 strips of 8&1/2" x 1" - 21.5cm x 2.5cm.
Here it can be tricky if you don't watch what you're doing! I've had one interfacing fabric stuck on my iron other day, the gunk's still there on the iron plate! Now, following the picture above, put the iron-on side facing the fabric strip, which has been folded right sides together. This is when you'd need an iron now.
You can choose to iron straight on the fabric itself with the interface underneath, or use a Rajah Cloth and iron interface on the fabric. Remember to keep the shiny side of the interface on the fabric!
Ensure the interface is placed on the edge of the folded fabric and in centre of the length of the strip.
Now here is something I've hated to do - turn something inside out without anything to make it easier. I thought of a brilliant idea - use a wool string and have it as a means of pulling the inside out. So for this part, if you're adventurous enough like me, you'd need a reasonable length of a wool string (I've had this old green acrylic wool string measured around 40cm long) and a wood stick.
This is the machine I've been using for a while now, when my 'top of the range' Pfaff machine refused to cooperate with me a year ago. I originally bought this for my daughter but took it as mine for time being... Nice mummy, ain't I? ;) Sorry, got off the track here - you'd need a sewing machine now to sew up the strips. That's right - 70 of them!
Ensure the wooly bit is still visible, sew a straight line about 1/4" - .75cm from edge, turning at the corner then straight to the end.
Stopping here! You'd need an opening end to turn it inside out. Make sure the rest of the wooly string is not sewed on!
There! Nice and secure for now...
And if you pull the string gently at start, the top end should fold inwards, sometimes you'd need to help a bit by putting finger in to make a dent there. Keep pulling the string gently - I've had the string coming off, but that is ok, because the idea is to have the worst part done. This is when the wood stick comes handy. Use it to push the rest into the right side out.
Peek-a-boo!
You can try this, or use the usual method - thrush the stick and have the strip inside out quite roughly. I did snipped off the corners so it would make nice corners. Snip off the wooly string, pluck out any fluffy bits.
Then I ironed them nice and flat, ready to have the opened end sewn together.
Try and sew from the non-bulky end, that way the thread won't get caught up. Try to sew it closely to the end as you can.
There, one of 70 strips all done and ready for the next step.
I decided on using the snap fasteners rather than velcro or other sort. I want it to be easy for kids and won't get 'snared' by other stuff, etc over the period of storage.
For Snap-Fast technique, you'll need:
To start, you'll need 2 sets of studs - one set with prong and stud for inner section (this one is the one with bump) and other set with a socket with a prong as outer section.
Here you can see two prongs with stud on side. You'll need to pick where the prongs should go and press the prong into fabric.
This is when that funny tool comes handy as you press the small end inside the prong, so the sharp bits get through the fabric.
See?
Time to put a stud on... ensure it is placed right over the jutted bits of the prong.
Now the funny tool's head is used to hold the stud in place while you hammer it in.
Secured now.
This is where a sort of plan-ahead is needed because you would want to be sure both stud and socket are on the right place and side! I've had the stud on one side with a prong at end so the socket will meet the stud in the right way. Click on image to see what I mean.
This is where I had trouble until I worked it out. The socket has two sides, the one with dark inside is placed over the prong with the 'shiny' side on top. Again, ensure you've got the prong placed right, with the bits being pushed through the fabric, the socket placed on top of the jutted bits of the prong.
Hammer it in. And you're done!
One down, 69 to go!
Nice and almost paper-like strip met to make a circle, eh?
All strips ready to be joined!
I love the fabrics here - will make another set soon so I'd have the chain much longer than it is now.
I do hope this tutorial is quite clear. Please do ask me to clear up anything on this.
Cheers till later!
I got the idea from filminthefridge.com, however I made some modifications. So thought I'd create a tutorial on making this and using the snap-fasteners as it took me a bit to work out how it really works and I cannot find one online!
So to have a chain of 70, you would need:
- 5 fat quarters of fabric - I cheated by buying a pack of 5 colour coordinated fabrics!
- 1 x 100cm-wide 'Non woven iron-on interface (1600F-white), approx 45cm long.
- 2 x packs of "Gripper Studs" (50 sets in a pack) - silver.
- Thread - I used grey coloured thread to cover all, rather than white.
Cut all 5 fat quarter fabric so they're 21" x 19" or 54cm x 48cm.
Then fold it into half at the widest side.
Here, you'll be cutting strips of 3" x 19" - 7.5cm x 48cm (the widest side being folded in half - hope this make sense?). You should have 7 strips then.
Now, open the strips and cut in middle, thus you'll have 14 strips of 3" x 9&1/2" - 7.5cm x 24cm per fat quarter.
![]() |
| The left strip shows the shiny dots, meaning it's the iron-on side, while the right side strip is the other side - click on image to see it closer. |
Interface - As there are many types of interfacing, I decided on thin type of interfacing as I wanted it to be more paper-like, rather than 'puffy' fabric. So I used non woven iron-on interface, the one I found was labelled as 100cm white non-woven iron-on interfacing fabric which was priced at about AU$2.50 per metre. Here I've tried to take a photo to show how you'd know if it is iron-on interfacing fabric, but didn't really succeed. On one side you'll see tiny shiny dots, while the other side doesn't have that - that means the shiny dotted side is the one you'd want to iron onto the fabric as they're glue.
Anyway, if you've cut the 100cm wide interfacing fabric at 8&1/2" - 21.5cm twice, you'll then need to cut both wide strips into 1" - 2.5cm strips. Thus you should have 80 strips of 8&1/2" x 1" - 21.5cm x 2.5cm.
Here it can be tricky if you don't watch what you're doing! I've had one interfacing fabric stuck on my iron other day, the gunk's still there on the iron plate! Now, following the picture above, put the iron-on side facing the fabric strip, which has been folded right sides together. This is when you'd need an iron now.
I've got my wonderful hand-sized iron, bought from a craft fair few years ago and loved it! It can be found at http://www.punchwithjudy.com.au/shop/mini-steam-iron.html
You can choose to iron straight on the fabric itself with the interface underneath, or use a Rajah Cloth and iron interface on the fabric. Remember to keep the shiny side of the interface on the fabric!
Ensure the interface is placed on the edge of the folded fabric and in centre of the length of the strip.
Now here is something I've hated to do - turn something inside out without anything to make it easier. I thought of a brilliant idea - use a wool string and have it as a means of pulling the inside out. So for this part, if you're adventurous enough like me, you'd need a reasonable length of a wool string (I've had this old green acrylic wool string measured around 40cm long) and a wood stick.
Open up the folded strip and place the string in middle with bit out at the end.
This is how it should look like - bit like a flat tampon, eh? Lol...
This is the machine I've been using for a while now, when my 'top of the range' Pfaff machine refused to cooperate with me a year ago. I originally bought this for my daughter but took it as mine for time being... Nice mummy, ain't I? ;) Sorry, got off the track here - you'd need a sewing machine now to sew up the strips. That's right - 70 of them!
Ensure the wooly bit is still visible, sew a straight line about 1/4" - .75cm from edge, turning at the corner then straight to the end.
Stopping here! You'd need an opening end to turn it inside out. Make sure the rest of the wooly string is not sewed on!
There! Nice and secure for now...
And if you pull the string gently at start, the top end should fold inwards, sometimes you'd need to help a bit by putting finger in to make a dent there. Keep pulling the string gently - I've had the string coming off, but that is ok, because the idea is to have the worst part done. This is when the wood stick comes handy. Use it to push the rest into the right side out.
Peek-a-boo!
You can try this, or use the usual method - thrush the stick and have the strip inside out quite roughly. I did snipped off the corners so it would make nice corners. Snip off the wooly string, pluck out any fluffy bits.
Then I ironed them nice and flat, ready to have the opened end sewn together.
Try and sew from the non-bulky end, that way the thread won't get caught up. Try to sew it closely to the end as you can.
There, one of 70 strips all done and ready for the next step.
I decided on using the snap fasteners rather than velcro or other sort. I want it to be easy for kids and won't get 'snared' by other stuff, etc over the period of storage.
For Snap-Fast technique, you'll need:
- Sturdy surface - here I used kitchen bench with the support.
- Tiny hammer and mat.
- The 'Gripper Studs' pack, which should come with 50 sets and a funny tool.
To start, you'll need 2 sets of studs - one set with prong and stud for inner section (this one is the one with bump) and other set with a socket with a prong as outer section.
Here you can see two prongs with stud on side. You'll need to pick where the prongs should go and press the prong into fabric.
This is when that funny tool comes handy as you press the small end inside the prong, so the sharp bits get through the fabric.
See?
Time to put a stud on... ensure it is placed right over the jutted bits of the prong.
Now the funny tool's head is used to hold the stud in place while you hammer it in.
Secured now.
This is where a sort of plan-ahead is needed because you would want to be sure both stud and socket are on the right place and side! I've had the stud on one side with a prong at end so the socket will meet the stud in the right way. Click on image to see what I mean.
This is where I had trouble until I worked it out. The socket has two sides, the one with dark inside is placed over the prong with the 'shiny' side on top. Again, ensure you've got the prong placed right, with the bits being pushed through the fabric, the socket placed on top of the jutted bits of the prong.
Hammer it in. And you're done!
One down, 69 to go!
Nice and almost paper-like strip met to make a circle, eh?
All strips ready to be joined!
I love the fabrics here - will make another set soon so I'd have the chain much longer than it is now.
I do hope this tutorial is quite clear. Please do ask me to clear up anything on this.
Cheers till later!
Labels:
fabric paper-like chain,
interface,
snap fasteners,
tutorial,
xmas deco
Dec 7, 2011
Fabric 'Paper' Chain...
Hello, I haven't forgotten you - just that I am having so much trouble with Photoshop Elements 9 since I upgraded my iMac OS to 5.1, argh!
So this means no photos for a while till both companies (Apple and Abode) work this issue out. I might have to resort in using different program but that would take more time out. Sighs...
Anyway, I've been sewing this adorable fabric 'paper chain' strips for xmas decoration and I am nearly finished, however I am starting to think that 35 strips may not be enough! I've been taking photos as I am thinking of turning it into a tutorial.
I also have been busy brainstorming more sewing ideas, but tidied up bookshelf and stashes so I'd know what I've got and use them all up as much as I can before buying any more!
Next year I will have to set up my schedule more differently - I will be using a whole month for either sewing or scrapbooking so thus both will get to be done more quicker than they have been for this year.
Anyhow, I've decided to join the concept of "WIPocalypse 2012" for fun as I have too many unfinished craft projects all over my study! WIP stands for 'work in progress' and the -ocalypse means that there may be Apocalypse at the end of 2012 as a tongue in cheek. I thought it would be funny to do that - at least I can try to say I can go into oblivious and report to the past-life review that I did as many WIPs as I can! ;)
Cheers till I come back with a tutorial!
Later, peeps!
So this means no photos for a while till both companies (Apple and Abode) work this issue out. I might have to resort in using different program but that would take more time out. Sighs...
Anyway, I've been sewing this adorable fabric 'paper chain' strips for xmas decoration and I am nearly finished, however I am starting to think that 35 strips may not be enough! I've been taking photos as I am thinking of turning it into a tutorial.
I also have been busy brainstorming more sewing ideas, but tidied up bookshelf and stashes so I'd know what I've got and use them all up as much as I can before buying any more!
Next year I will have to set up my schedule more differently - I will be using a whole month for either sewing or scrapbooking so thus both will get to be done more quicker than they have been for this year.
Anyhow, I've decided to join the concept of "WIPocalypse 2012" for fun as I have too many unfinished craft projects all over my study! WIP stands for 'work in progress' and the -ocalypse means that there may be Apocalypse at the end of 2012 as a tongue in cheek. I thought it would be funny to do that - at least I can try to say I can go into oblivious and report to the past-life review that I did as many WIPs as I can! ;)
Cheers till I come back with a tutorial!
Later, peeps!
Jul 6, 2011
My Sewing/Craft books shelf
For proof of meeting the Sewing/Craft books challenge, I thought I'd take photo and post it here to hold myself accountable!
Nice collection, eh?
I've been referring to some books for a while however I have not really used much from most of the books so the challenge is just what I needed.
I've been getting lots of nice comments about the skirt I made for my girl, someone asked if I plan to sell some... lol!
Next project will be from Martha Stewart's Encyclopedia of Sewing and Fabric Craft, especially the one with pinboard! Give me a week or so to gather materials and when it's all done, I'll post photos here then.
Till then, cheers!
Nice collection, eh?
I've been referring to some books for a while however I have not really used much from most of the books so the challenge is just what I needed.
I've been getting lots of nice comments about the skirt I made for my girl, someone asked if I plan to sell some... lol!
Next project will be from Martha Stewart's Encyclopedia of Sewing and Fabric Craft, especially the one with pinboard! Give me a week or so to gather materials and when it's all done, I'll post photos here then.
Till then, cheers!
Jun 29, 2011
Skirt done!
As per the Sewing Book Challenge in previous post, I've completed the skirt I set out.
Here my happy girl's wearing it - she already make dates on wearing the skirt to, etc. Cute.
Comments about making this skirt:
1. I won't make it again in a hurry although I might with lighter fabrics - it is much more complicated for a 'beginner'. Also it is not so visual enough for me to see where things could be going at.
2. I think the author was trying to cram in too much info and not enough clear steps and possible ideas or tips in each pattern.
3. It was my first time using velvet fabric and didn't realise it would be so stretchy and shed so much. It took me much longer to get the top skirt done, compared to the underskirt.
4. My girl had so much fun choosing bits to decorate her skirt. All those ribbons were the cut-offs from the clothes - you know those the shops use to hang clothes, etc. Not wasted here, eh? The little hearts were felted and beaded, I got them from Spotlight on special a while back and now they're on her skirt. I refused to go shop to buy anything to add to construction of this skirt - quite determined to use what I've got around here.
5. My girl's already eyeing a jacket and a shirt from the book - so I might make them one day later in the year as I am not keen on going back to that book. heh.
What do you think?
Cheers till later!
Here my happy girl's wearing it - she already make dates on wearing the skirt to, etc. Cute.
![]() |
| Full of smiles, eh? |
![]() |
| back of skirt |
![]() |
| front |
![]() |
| close-up details |
![]() |
| My tag "Chookie." |
![]() |
| Twirling the skirt time |
1. I won't make it again in a hurry although I might with lighter fabrics - it is much more complicated for a 'beginner'. Also it is not so visual enough for me to see where things could be going at.
2. I think the author was trying to cram in too much info and not enough clear steps and possible ideas or tips in each pattern.
3. It was my first time using velvet fabric and didn't realise it would be so stretchy and shed so much. It took me much longer to get the top skirt done, compared to the underskirt.
4. My girl had so much fun choosing bits to decorate her skirt. All those ribbons were the cut-offs from the clothes - you know those the shops use to hang clothes, etc. Not wasted here, eh? The little hearts were felted and beaded, I got them from Spotlight on special a while back and now they're on her skirt. I refused to go shop to buy anything to add to construction of this skirt - quite determined to use what I've got around here.
5. My girl's already eyeing a jacket and a shirt from the book - so I might make them one day later in the year as I am not keen on going back to that book. heh.
What do you think?
Cheers till later!
Jun 19, 2011
You sure it's June already?
Ack!
Oh well... My excuse is that I blinked... would you accept that? :D
Anyway, I've been surfing, creating, cleaning, planting, dreaming, reading and such for few months. And I'm working on a skirt for Jackie and this comes up in a good time cos of this:
Basically the Challenge is to use up a pattern or idea from each sewing book we've got on the shelf every month to make it worthwhile to keep that book on shelf.
What do you think? Could I do it?
Well at the moment, I've got this book:
And I've picked a skirt pattern called Insa Skirt which is double layered skirt for my girl. When it's done, I'll take a photo of it. Looks great at the moment anyway.
I will make a tutorial next week on a pouch I made other month and another tutorial on a sandwich bag I created last year to sell at a market which didn't sell as well as I thought, but my kids and I love them. Go figure!
Cheers till later!
Oh well... My excuse is that I blinked... would you accept that? :D
Anyway, I've been surfing, creating, cleaning, planting, dreaming, reading and such for few months. And I'm working on a skirt for Jackie and this comes up in a good time cos of this:
Basically the Challenge is to use up a pattern or idea from each sewing book we've got on the shelf every month to make it worthwhile to keep that book on shelf.
What do you think? Could I do it?
Well at the moment, I've got this book:
| {image from Amazon.com} |
And I've picked a skirt pattern called Insa Skirt which is double layered skirt for my girl. When it's done, I'll take a photo of it. Looks great at the moment anyway.
I will make a tutorial next week on a pouch I made other month and another tutorial on a sandwich bag I created last year to sell at a market which didn't sell as well as I thought, but my kids and I love them. Go figure!
Cheers till later!
Labels:
challenge,
craft book challenge,
sewing challenge,
skirt
Feb 15, 2011
It's BOY Month!!
Already both Made by Dana and Made by Rae are hitting it straight hard with tutorials that cater for boys!!

Gonna do the slippers for 'everyone'! :D
The pants is on the top of sewing to-do list anyway so it's nice to have visual examples to follow!
So let's follow those two sites and sew as much as you can for our boys, eh?
Cheers till later!
Oh for those who wonders, I've had to do nil sewing for last 3 months due to the renovations in my study, as well into most bedrooms! Argh! Mess everywhere! Oh sorry its "Organised Chaos everywhere" - better? ;)
Gonna do the slippers for 'everyone'! :D
The pants is on the top of sewing to-do list anyway so it's nice to have visual examples to follow!
So let's follow those two sites and sew as much as you can for our boys, eh?
Cheers till later!
Oh for those who wonders, I've had to do nil sewing for last 3 months due to the renovations in my study, as well into most bedrooms! Argh! Mess everywhere! Oh sorry its "Organised Chaos everywhere" - better? ;)
Oct 5, 2010
Op Shop Swap
From a forum I've been involved with for few years hosted an Op Shop Swap that I participated. I received a bundle of interesting stuff:
In the next posting I will put up some pages from the old sewing booklets. All's so interesting and some make sense to me now after trying to figure out what some sewing terms meant, etc.
Gotta go and do more sewing - am selling stuff at two markets in Melbourne next month, exciting.
Cheers till later, peeps!
In the next posting I will put up some pages from the old sewing booklets. All's so interesting and some make sense to me now after trying to figure out what some sewing terms meant, etc.
Gotta go and do more sewing - am selling stuff at two markets in Melbourne next month, exciting.
Cheers till later, peeps!
Sep 5, 2010
MADE
Subscribe to:
Posts (Atom)